Showing posts with label arduino. Show all posts

Wednesday, 25 February 2015

Security Webcam: (Improve) Uploading Photo to Dropbox with a Linux Board


Recently I bought a used webcam Microsoft Lifecam HD3000 on ebay.
I was interested in this device because it is Linux compatible and it can be used with one of my linux boards: Arduino Yun.


I was interested to use the Webcam, the Yun and a Pir Sensor to make a rudimental security camera system for my home.

If you are interested in this type of activity, you can find a lot of material, just "googling" (and of course you can use another linux board, like a raspberry pi):
What I didn't like from these projects is the way they execute actions from the arduino side.

The components of my finished project are very similar to the first link from adafruit.com: a webcam, a pir sensor and the arduino yun.

The events on the Yun, Arduino side
The example that I've found works like this:
  1. wait for move event (eg. from pir sensor)
  2. use Process and call fswebcam to get a photo from the webcam
  3. use Process and call a python script to upload a photo on dropbox
  4. ... do something ...
  5. go back to 1.
Everytime in a yun's sketch you will use Process, you are blocking the execution of the arduino part until the command is completed.
As long as the step 3 is completed, it is impossible to capture another photo.
Some samples use Temboo for dropbox, but I don't like it: it makes the sketch more complicated to mantain and the Dropbox Api is easy to use.
Since I didn't want to wait the 3rd step or use Temboo api on my system, I have wrote some code.

My solution: Arduino part
In my solution the arduino part work like this:
  1. wait for move event (From pir sensor)
  2. use Process and call fswebcam to get a photo from the webcam saving it, in a temporary directory
  3. use Process to move the photo to a destination directory where will be picked by the linux part
  4. go back to 1
The step number 3 is needed to be sure that the photo is totally written before the upload on dropbox.
Now, I have again 2 call to Process... but move a photo of less than 100 kbyte from a directory to another is faster than uploading the same photo to dropbox.
The arduino side, it is indipendent from the dropbox upload: this is a job for the linux side.
(if you want the arduino's sketch, just ask in the comments).

Linino part
I wrote a python script upload_to_dropbox.py in /root, that is able to continually check the photos's destination directory and when it finds one new, it uploads it on my dropbox account and on a succesfull upload, it deletes the local photo from the yun.
For setup of python and dropbox library on arduino yun I have followed this tutorial.
What I have changed from it, it is the sketch and the python script.

The python script is here, just edit it with your generated dropbox key.

 import dropbox  
 import glob   
 import os  
 import json  
 from time import sleep  
 photodir = '/mnt/sda1/arduino/www/';  
 client = dropbox.client.DropboxClient('DropBoxGeneratedKeyGoHere')  
 #starting main loop here  
 while(1):  
      toupload = glob.glob(photodir+'*.jpg');  
      try:  
           for fname in toupload:  
                print "Uploading... " + fname;  
                f = open(fname, 'rb');  
                response = client.put_file(fname[len(photodir):], f);  
                print "uploaded" + fname[len(photodir):];  
                print response['bytes'];  
                if(response.has_key("bytes") and response['bytes'] > 0):  
                     os.remove(fname);   
           sleep(0.3);  
      except:  
           sleep(2);  

In order to start the script automatically on each boot of the Yun, you need to edit /etc/rc.local adding:

export PYTHONPATH=/mnt/sda1/python-packages
python /root/upload_to_dropbox.py &


Wednesday, 5 March 2014

Showing my heart rate while playing a scary game: Slender Game


 Yesterday, I've done this video:

Watch fullscreen

It shows me and my heart rate while playing Slender (www.slendergame.com).
With arduino, pulsesensor.com and some scripting I was able to monitor my heart rate.

Normally when I'm calm, my heart rate is around 50 BPM.
If you want to watch the most funny part of the video, go to minute 14 and watch how the BPM changes.

It's not hard to reproduce something like that.

Tuesday, 5 November 2013

Plot a graph with Arduino Yun

This is a short article, some "tips&tricks" if you need to plot a chart with data generated from the Arduino Yun.
I report it here, just to report my work.

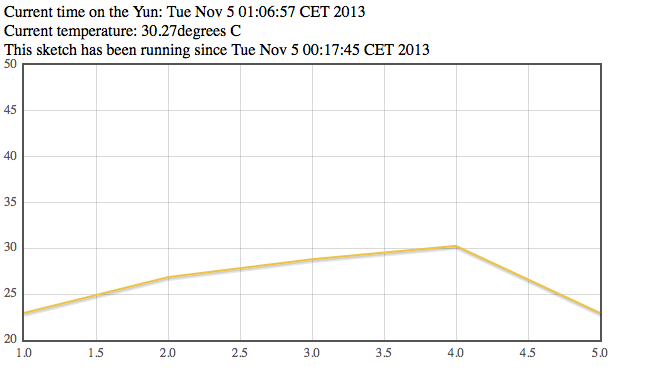
This article starts from this: http://arduino.cc/en/Tutorial/TemperatureWebPanel that explain how to use the Bridge to capture data from a temperature Sensor and make the data accessible from a web page inside an sdcard on the Yun.

Plot a chart
My scripts, it helps to plot the last 5 temperatures.
You have to change a little bit the script on the page and replace some files.

1 - I've added this at the beginning of the arduino script:
float lastTemp[5];
to save the last 5 temperatures
2 - Replaced  this part
      client.print("Current time on the Yun: ");
      client.println(timeString);
      client.print("
Current temperature: ");
      client.print(temperature);
      client.print(" degrees C");
      client.print("
This sketch has been running since ");
      client.print(startString);
      client.print("
Hits so far: ");
      client.print(hits);
with this one:
      lastTemp[hits%5] = temperature;
      for(int i=0;i<5;i++){       
client.print(lastTemp);

        client.print(";");
      }
      client.println(timeString+";"+startString+";"+hits+";");


So the page from arduino now it retuns all the data plus the last 5 temperature read, separated by ";"

3 - I've replaced the files in /arduino/www/TemperatureWebPanel with the ones HERE: it uses jquery and jflot

This is the final plot:


This is not the rightway
My script plot the last 5 request read from the sensor, but the right way is to leave the arduino part to ciclic fetch the temperature and save it on a file on the sdcard.
The html/js page need to read the same file and plot the temperatures with the data from the file.
I will update it later with a new solution.

Monday, 14 October 2013

My First Impressions On The Arduino Yun

These are great years for geek: hardware is cheaper and new gadget come out everyday
It's our time!
Our creativity is screaming inside us, due to the incredible number of things that everyday comes out.
Some days ago I bought an Arduino Board Yun (all the specs here).

I mainly bought it just to support Arduino: because it's an italian project and I was curious to see if the new Yun have the same potential of Arduino Uno.

Anyway reading the specs, these are the things that I like most on this board:

  • The Arduino part of Yun is an Arduino Leonardo's like (mouse and keyboard feature!)
  • ethernet,wifi,sdcard support: no more expensive shell to add (Note: if you can reach internet you can use NTP, so you don't need an RTC)
  • a real processor with Linux: and all the possibilities offered by linux software. The distro is Linino, based on the famous OpenWrt!
  • linux + usb: means attach webcam, pendrive, other usb devices.
  • POE support(from the doc: "The Yún is also compatible with PoE power supply but in order to use this feature you need to mount a PoE module on the board or buy a preassembled one."
  • Wifi capabilities means: no bother with bluetooth, zigbee, android adk... you can write app on mobile that talk with Yun just with http/html/js (for example).
  • Wifi support accesspoint mode: this means you can connect things with wifi using Yun as the hotspot
  • Can be remote programmed: do you need to upgrade the software on the arduino connected in another room? Now you can thanks to wireless
  • Same dimension of the current Arduino Uno.
  
Arduino Uno (left) & Yun (right)

  • Temboo: do you need to use dropbox, flickr, twitter, facebook, google calendar, google docs or other online services with your Yun? Temboo is a framework that let you work with those services easily, standardizing the way you access these API... and it works with your Yun of course!

I don't think Yun is here to beat raspberry pi (maybe only in few project) but to replace existing project with Arduino uno/leonardo with a new powerful version able to: easy connect to internet, communicate with "things", remove expensive shields, improve experience and help you to fast prototype IOT objects.
For now, it seems that the standard Linino image shipped with yun is limited..but it's Opensource Baby... and so..the next step is this: github/repo.
See you soon with new info about Yun!

Wednesday, 29 May 2013

Blackberry10 and Arduino: how to make them friends

This is an image and a video showing the arduino interacting with my dev alpha C (like a blackberry Q10):


You can find the Bluetooth Cascades app here: https://github.com/blackberry/Cascades-Samples/tree/master/bluetoothsppchat

For arduino just follow the previous tutorial: http://pestohacks.blogspot.it/2013/05/arduino-bluetooth-rn-42-recently-ive.html

Tuesday, 21 May 2013

Arduino & Bluetooth RN-42

Recently I've started to deeply experiment with Arduino.
My last experiment involved using bluetooth.
I've bought a bluetooth module: RN-42 , cause it is cheap and there are a lot of tutorial around the web that talk about it.

Connection to the Arduino Uno

The image above rappresent the connection on the front of the chip.
To make it working with Arduino you should connect:
  • RN42 PIN 11 to Arduino 3.3V
  • RN42 PIN 12 to Arduino GND
  • RN42 PIN 13 to Arduino TX
  • RN42 PIN 14 to Arduino RX
  • RN42 PIN 16 to RN42 PIN 15
After that you have to power ON Arduino.

Setup the module
I have used an android application, BlueTerm (free), to setup the module.
The RN-42 have a "command" mode to change the parameter of the module: speed, bluetooth name, and other options.

After power on the module, pair your device (or simply your pc) with the RN-42, the PIN is 1234.
Than use a bluetooth terminal to connect to the module again and type these commands:
$$$
SU,11
S~,3
SN,whatevernameyouwant
---
The $$$ means "enter command mode" instead "---" means "end command mode".
After every command you should see an "ACK" response from the module.

The description of the above commands and all the available commands are reported here : https://www.sparkfun.com/datasheets/Wireless/Bluetooth/rn-bluetooth-um.pdf

Testing the connection
Connect your arduino and launch the ide.
Write the following code:

void setup() {              
   Serial.begin(115200);

}
void loop() {
  Serial.println("hello bt");

 delay(1000);  
}

and then load it with usb connection to arduino.
Now use a bluetooth terminal to connect to the module and read the data.

Check this video if you are searching a good tutorial.